
3D Environment
For this diorama project I will be constructing a 3D interior connected to the Ancient Egyptian character I have been developing in the Animation Practice module. Here's a link to that research and development:

It's week two as I write this, so I have a fairly loose idea of how my character exists in the story I will flesh out further down the line. As it stands, I have designed an undead mummy whose misplaced jokes in the pharaoh's court lead to him being buried alive - only to reanimate in a modern day museum. I imagine him as a jester, ever present in the royal court, with perhaps a modest private quarters.
Just to get started, I have created an initial moodboard of general, grand Ancient Egyptian interiors. These images are a mix of film sets, animation backgrounds, illustrations and video game environments. Given our distance from the time period, we only have artists' impressions of Ancient Egypt in its golden age. I like to look for lighting and atmosphere to set mood for a sense of place, although I won't be lighting my diorama until much later on.


Virtual explorations
It occurred to me that I can explore a variety of period-accurate dwellings by using the video game Assassin's Creed: Origins, which is set in Ancient Egypt. The game was thoroughly researched, with egyptologists contributing to make the world as accurate and authentic as possible.


My experience with modern video games is very limited, and I am borrowing use of my partner's Xbox, so this kind of exploration is still novel to me. The last time I regularly used video games was when I had a PlayStation 2 in the early 2000s, so it's exciting to discover just how much detail is involved in games made today. The games industry is possibly something to consider for future career options, so it's good to familiarise myself with the aesthetics and potential of 3D modelling.

I am paying close attention to the objects, furniture and layout of the interiors available. It is very helpful to see a photorealistic rendering of such objects as they would have been used, as opposed to viewing a museum piece out of context and usually in poor condition. We are used to seeing mainly the lavish regal environments depicted in epic films, so it's refreshing to see a mix of more humble settings.
With the Pinterest board below, I am continuing to collect images of Egyptian interiors. Recognising the authentic kinds of furniture and wall patterns at this stage should help down the line in creating the right effect for my diorama.

Sketchbook
Drawing directly from the aforementioned influences, I started sketching out several rooms. I was looking for different layouts of furniture and overall floor plans, as I could then cherrypick my favourite parts to make my own design. It's a valuable exercise to experience various spaces through sketching. Merely looking at flat images can easily make you miss how an environment would feel three-dimensionally; sketching helps me to understand what it would be like to inhabit each space.


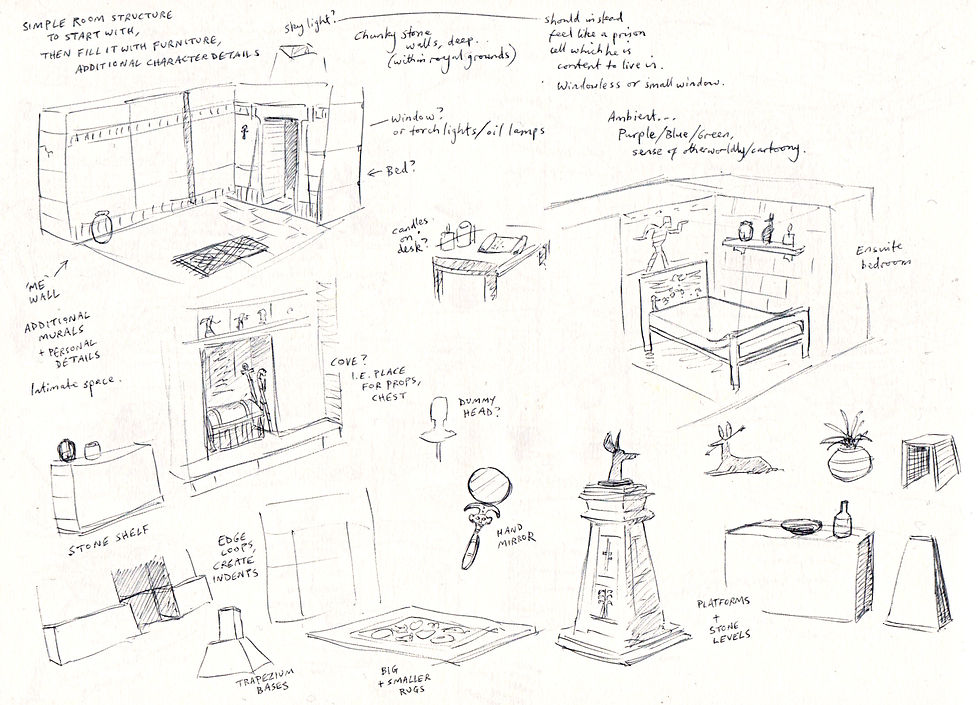
Concept painting
Using a selection of features from my preparatory sketches, I created this piece of concept art in pencil and gouache paint. I really benefited from collecting a variety of different images to find the right mix of objects and room layout. By the time I had begun sketching my final version, I already felt familiar with all of the individual pieces so it felt natural to invent a new space.

With this artwork to refer to going forward, I wanted to establish an inviting mood. The warm colour scheme comes from the suggestion of candlelight and the golden palette we associate with Ancient Egypt. I hope it also gives the sense of a cosy, lived-in space, which would be comfortable for my character to work in. I ultimately want a room that is rich in texture and specific homely details.


Inspirations
It keeps me motivated to have a character and story in mind as I develop my diorama, knowing that my concept drawings have a specific narrative meaning. Though it can be rewarding to create an environment for its own sake, I get much more from the notion that I am designing a set which could potentially be used for an animated story.
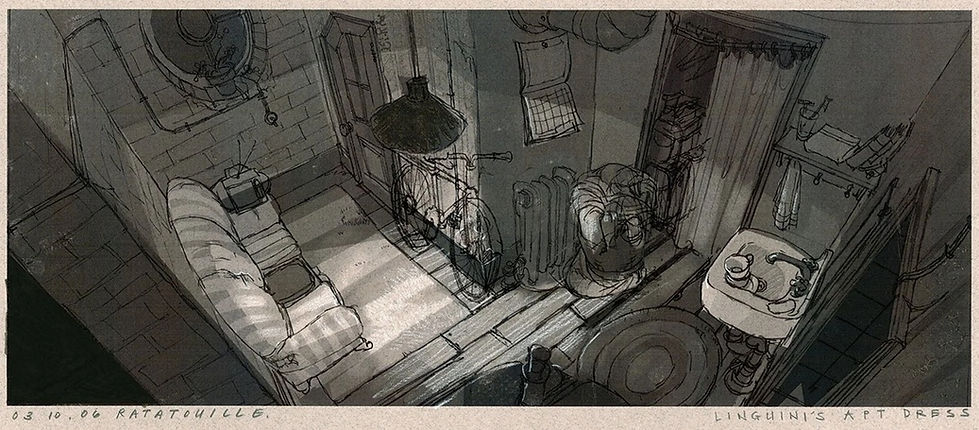
Shown here are a selection of pieces of 'apartment' concept art from Pixar, each developed for their respective films (Toy Story 2, Monsters, Inc. and Ratatouille). Even if the final product comes in the shape of 3D modelling, evidently there is still great value in traditional art to explore ideas about setting. I find Pixar's concept art not just beautiful to look at but a great example of setting a scene to tell us something about the characters who live in the space.
Also, here's a Simpsons shot as a reminder to myself that sometimes it's best to keep it simple. I can tend to think that more details make for more impressive work, but you can lose something in clarity. There's a brilliant elegance in the design of the Simpsons house, perfectly suited for the characters.
Modelling
I am using my concept painting as the blueprint for modelling, and will attempt to create each object as faithfully as possible. If it is difficult to replicate something, I can always adapt. I hope to learn progressively more complex modelling techniques with each object.
I have started with the simple box-like structures of the walls and floor, and will keep to the basic objects like the table and podiums for now, with additional decorative touches to make them feel individual. The specific design of the table, for instance, was taken from a screenshot of Assassin's Creed.


It is helpful to have a variety of smaller objects to experiment on. There is no real consequence if I mess it up, I can always start again with one of the poly primitives, like with this desk pyramid. I am testing the use of additional edge loops and adding divisions to give me more faces to play with.


With this Anubis head, I am just hand-modelling by extruding faces and moving the positions of vertices/edges/faces. I'm sure there are more sophisticated kinds of modelling for animal figures, but here I don't mind the blocky aesthetic as it fits in style with Egyptian statues. I am learning a lot by just seeing what is possible in this low poly form. It is still difficult to know when an object has too many faces for complex rendering, so I am keeping the number of faces to a minimum.
I enjoy these character details that build a portrait of the jester's study. It seems true to Zub's character to take a divine figure like Anubis and treat it with the irreverence of a joke shop toy.
UV mapping
It can be overwhelming to put off the next stage of the project so I am UV mapping objects as I go. This helps me to see the room as a whole coming together, even when just a couple of objects are textured.

The mapping can be quite time-consuming, particularly if it is a complicated object with certain areas that need to be textured in a specific way and I need to find where the faces match up with the 3D object.


It was useful to learn how to adjust how light bounces off the objects. The default settings seem to work for most things, but on this pyramid pen pot, I need a harder, reflective effect.
Although I am at a beginner level and learning very basic tools, it is gratifying to see how effective it all can be. Not everything has to be 100% photorealistic to be convincing - the more objects in the room, the more it feels generally authentic.
Here's another application of the bend tool used on the glasses workshop, this time on a leaf for my plant pot (and also used for the scrolls). I needed a couple of attempts as initially it was too thin and the form collapsed in on itself when bent. I made it slightly chunky to prevent this.
Again, it's not completely realistic, but realistic enough when viewed at a distance. I duplicated the leaf and re-positioned it to make a complete plant.


With each piece, it got easier to spontaneously model something. Here's a statuette which resembles Zub, in a cartoonish Egyptian pose.
For any pots/vases/jugs I reused the same rounded, hollow form and reshaped for a new object. Most of my animation projects are teaching me to take these kinds of shortcuts where I can, without compromising on the overall effect.
Finished diorama
I took these screenshots of the diorama once everything was modelled. There are some lighting effects here in preparation for final rendering.


I like to include hand-drawn elements where I can, and so I drew this set of PNG sketches showing Zub posing for his audience (featured in the original concept painting). It fits his character to sit facing an ego-centric mural, contemplating other ways to get a round of applause.

On his desk are an Ancient Egyptian mirror, so he could practice his facial contortions, and a bit of papyrus scroll for writing new ideas for gags.

Here is a simple en-suite bedroom, for crashing after a long day performing for the Pharaoh.


Lighting

When lighting the room, I wanted to try something a bit more distinctive than the original candlelit concept. I am using a green point light as something of a ghostly presence, similar to the curse in my graphic novel story.
I was thinking of a couple of examples of green light in scenes I've seen i.e. Toy Story 2 and The Simpsons. It tends to stick in my memory when unusual lighting choices are made. It's a simple thing but makes a massive difference.


Other supporting lights here include: a warm directional light, a blue-purple ambient light plus additional purple directional light to emphasise the night atmosphere, and an orange point light on the back side to suggest a corridor lit by torch fire.


In the final rendering of a 360 degree turn, I needed to begin to understand how animation works in Maya. The turn itself needed animating, so I followed the online instructions provided. It took me a couple of attempts to understand grouping objects together so one would rotate around the other (i.e. camera rotating around the diorama).
An additional piece of animation was to move the green light through the set, as if an eerie living presence observing the empty space. It is quite subtle, and perhaps I could have made it a more extreme effect. As it is, it is something that you need to watch twice to notice - I like the feeling that there is some ghostly life, but you're not sure if you saw it or not.
This is as basic as animation gets, but I can't help feel excited by the possibilities it opens up. I have no idea if I will go on to make CGI stories, but I would like to at least attempt something. It would take a lot of practice to keep it from looking primitive, so I might need to choose my subject matter carefully i.e. plastic or metal characters. I really hope to find the time perhaps in the summer break to try a short scene, as I will likely only have Maya while I'm still a student.